
CLASH!® :
DOCUMENTATION / TUTOS/ FAQ
If you are a CLASH ! user, this section is designed to bring you aid elements to use CLASH !
If your CLASH ! seems to be broken, please check our diagnostic page -> Click here
- Product Presentation :
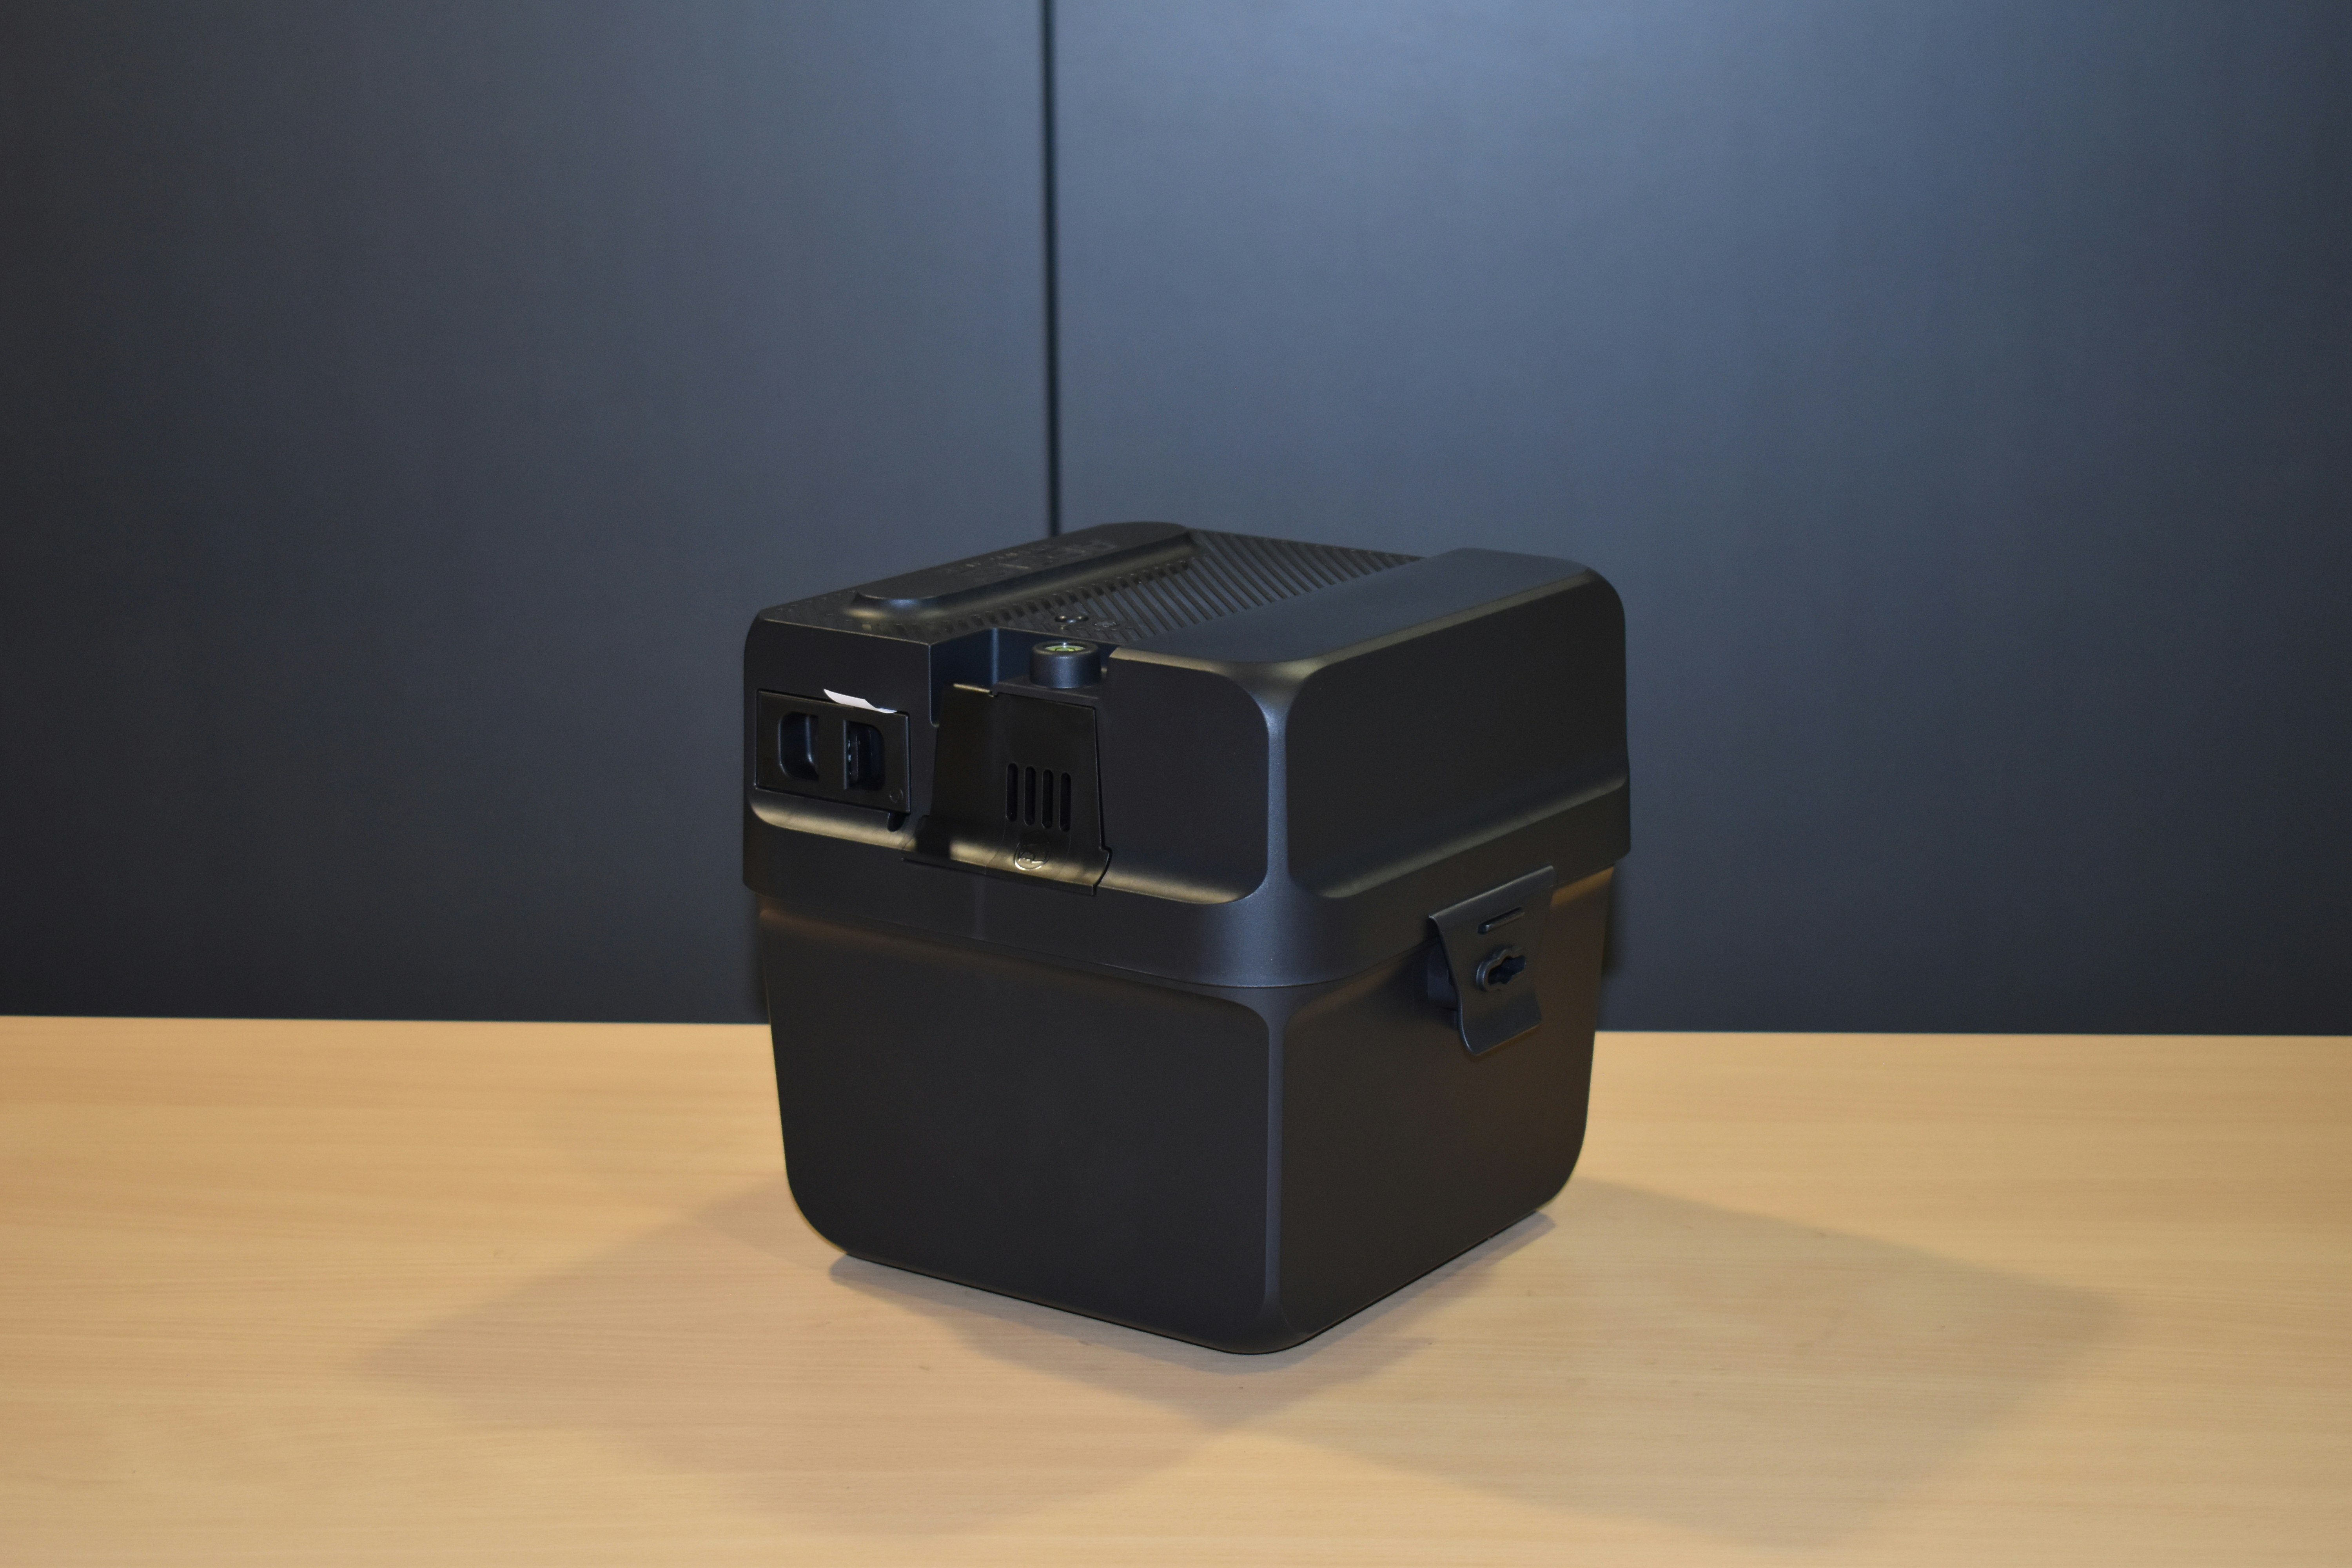
The CLASH ! is an electromechanical compact trap designed specifically to combat mice. It’s a discreet trap capable of hold up to 25 mice. Thanks to its tailored and airtight storage compartment, you avoid odor-related issues. It can be fueled by batteries or mains. You position it anywhere.
- User manual :
Clik here to have access to the user manual
- Customer Service :
Don’t throw away the CLASH ! box. You should use it for a potential after-sales return. Besides, you could find the trap’s serial number and the QR code that links to the tutorial.
TUTORIALS FOR USING CLASH !
1 - What can we found in a CLASH ! box ?
2 - Secure opening with the AEGIS universal key
3- The serial number
4- Power mode (batteries or mains)
5- Realisation of the ladder
6-Placement of placebo on ladder and bait drawer
7 - Fitting the bag and activated carbon
8 - How to turn on the CLASH ?
9 - How do I know the number of captures in my CLASH!
10 - How to turn off the CLASH ?
11 - Customer Service return procedure
12- Trap positioning


FAQ
1- Remove batteries from their housing.
2 -The place to connect the power cable is located in the middle of the central partition of the battery drawer.
https://vimeo.com/1044937082/bc7b6dfa3c?ts=0&share=copy

Use 4 LR-14 1.5-volt alkaline batteries.
No.
No.
Order a new power cable to LIPHATECH.
Approximately 60 mice.
The serial number of the CLASH ! is located on the product packaging or under the cover. It starts with PM, followed by 6 digits.
You could purchase them from LIPHATECH :
- Reference number Bags : 80022905
- Refenrece number Carbon available : 80030761
Even when the trap is activated, the LED remains off to save batteries. Press briefly :
- · If the CLASH ! is activated, the LED lights up (green, orange or red depending on the number of mice caught).
- · If the CLASH ! was turned off, the LED flashes in white and the trap performs a self-testing motion: Now it is activated.
No. To turn off the CLASH !, you need to press and hold the button until the LED lights up in white. You can then release it and the LED will gradually turn off: the trap is then deactivated.
Yes, although the whole point of CLASH ! is precisely to not use bait with active substances but simply a placebo.
The CLASH ! is safe for the user because the high voltage is coupled with low amperage.
Replace the bag :
1. Turn off the trap and open it.
2. Unclip the support piece, remove the full bag and close it.
3. Insert a new bag into the support piece and reclip it.
4. Close the trap and turn it back on.
Do a double click to reset the CLASH !.
1. If the indicator is always purple after a reset, change the batteries or plug the CLASH ! into the power outlet.
2. If the problem persists, remove the batteries, return the cover and check the tightness of the screws holding the plate under the hallway.
3. If none of these manipulations worked, head to the « I am experiencing technical issues » section (click here).
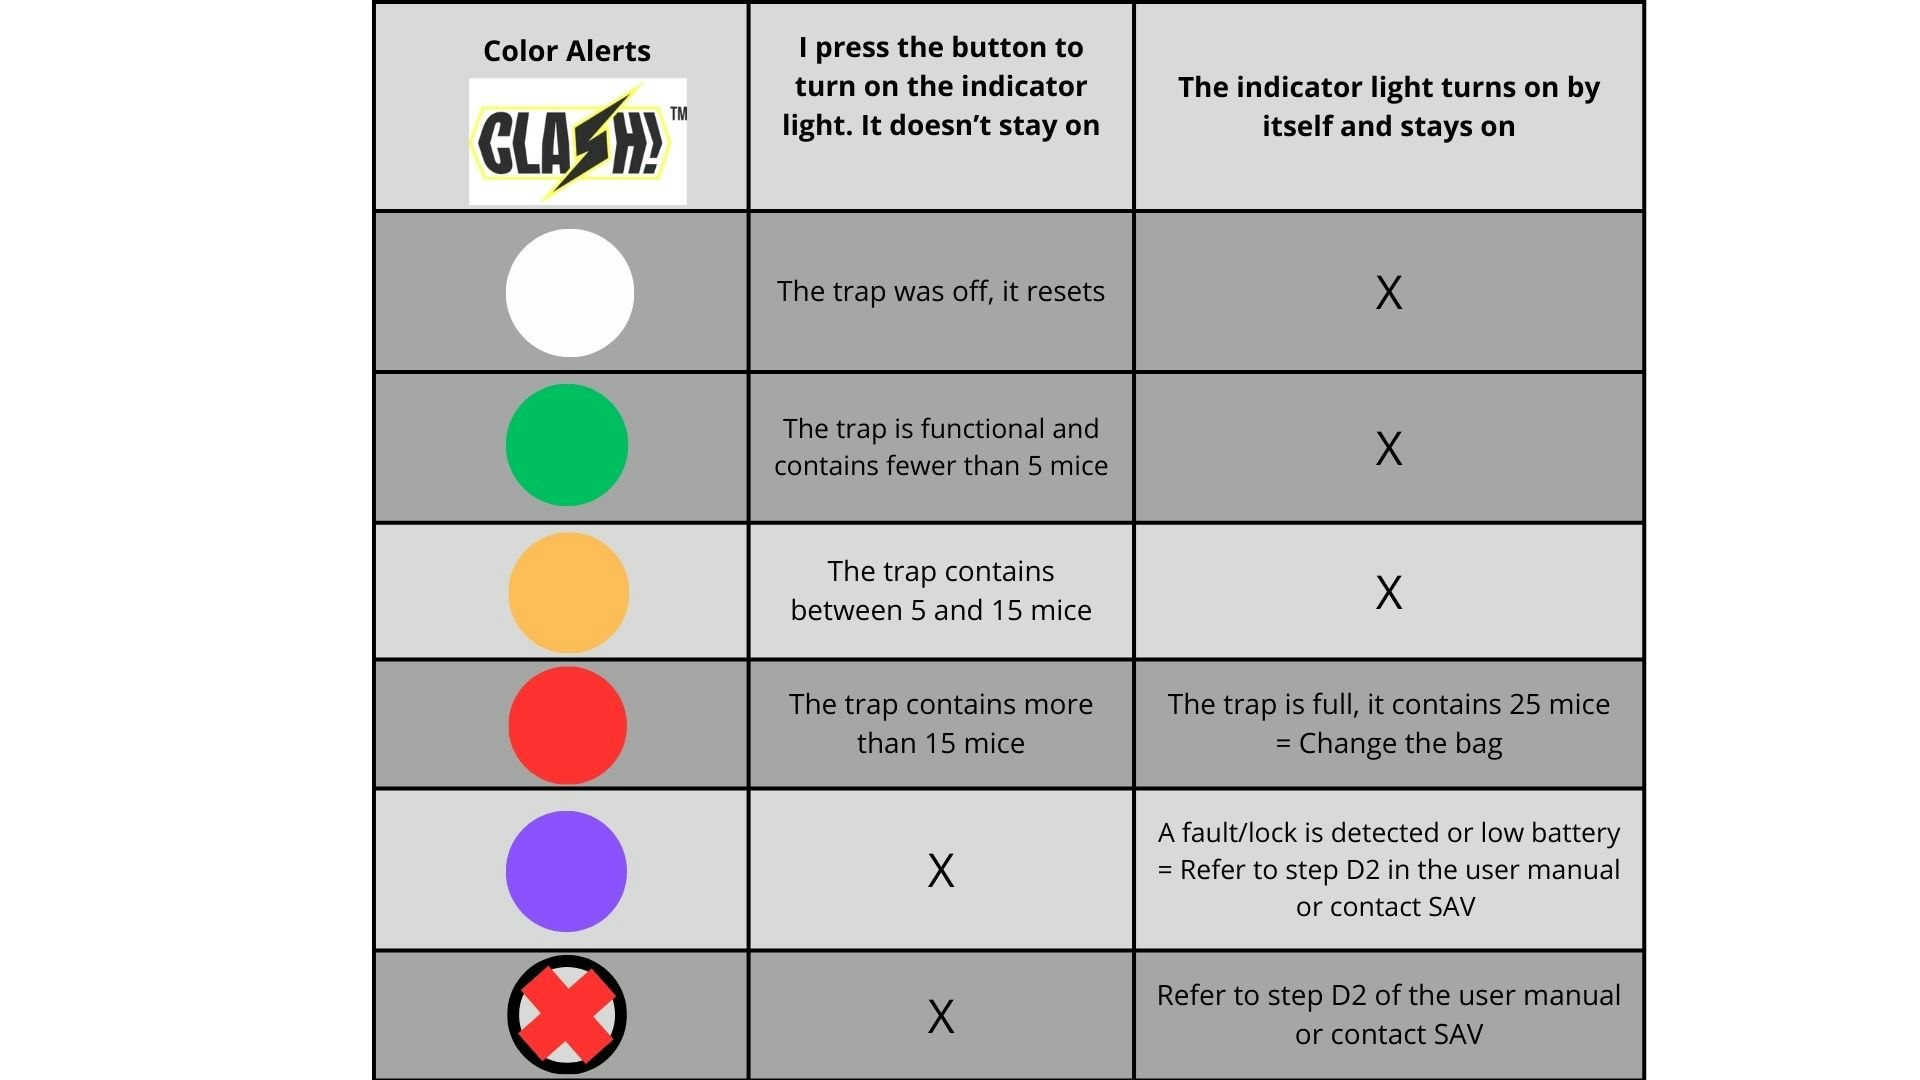
Press the CLASH ! button. The indicator lights up
White : 0 mice
Green : Between 1 and 5 mice
Orange : Between 6 and 15 mice
Red : Between 16 and 25 mice
When the bag contains 25 mice, the CLASH ! automatically turns off. The LED lights up in red and stay on. You must then replace the bag. It is still advisable to empty it regularly.
Press the CLASH ! button : what colour is the LED ?
· If the LED’s flashing in white, the trap is turns off. It is now activated.
· If the CLASH ! was activated :
1. Limit food competition around the trap
2. Make sure that the CLASH ! is positioned in a mouse traffic area, where traces of activity are visible.
3. Check that a placebo bait is present in the compartment provided for this purpose and in the small box of the bait holder. Also ensure that a small amount of bait has been placed on the ladder to attract the rodent.
Normally it’s not necessary because mice tend to be indoor. If you need to install it outdoors, always place it sheltered from the rain.
Only the electronic card and electonic components are manufactured in Asia, but they are assembled in France. Everything else (design, parts manufacturing, assembly) is done in France.
FAQ AEGIS.CONNECT
1. In a navigation panel located on the screen’s left, choose the site for which you want to edit the PDF report
2. In the « Editing » tab (on top of the screen) click on « Generate PDF »
3. Click on the « + » next to the site name
4. Change some elements if necessary
5. Think to save (below the page)
1. Make sure that the following elements have been successfully created on AEGIS.CONNECT :
a-The client
b-The site to be protected
c-The building(s) and optionally their storey(s)
2. For the connected objects (trap, station or hub), make sure to have their serial number(s) beforehand (SGXXXXXX ou PMXXXXXX or PCXXXXXX depending on the type of object). You could refer to the answer to question n°24.
3. Position yourself at the chosen building or storey level.
4. Begin to create the hub : in the Editing tab, select « Object Management ». On top of the screen, choose the number of objects to create and click on « go ». In the drop-down menu, choose « Hub », click on « go » and fill in the required fields.
5. To create your stations or traps, follow the same steps : select in the drop-down menu the objects to create, as well as their number, click on « go » and fill in the required fields. Remember to provide the number of the hub they will be attached to.
In the case of a single object creation, in the Editing tab, select « Object Management ». On top of the screen, choose the number of objects to create and click on « go ». The map view opens with a creation panel on the right, by default the object type is « connected station », it’s up to you to choose the object you want to create, fill in the required fields, then click on « Validate ».
6. You can also create non-connected objects : non-connected station, non-connected trap multi-capture, mechanical rat or mouse snap traps.
7. Click on the « Save » button to finalize the creation of all objects.
To create a new user (manager or technician) from the homepage
1.Go in the « User » tab located on top of the screen.
2.Click on the « New user » tile.
3.Fill in the form specifying the clients or sites to which this new user will have access.
4.Remember to specify the type of email alerts they will receive.
To create a new connected object, you must first create a hub by providing the serial number. Then, you can create new objects (stations or traps) attached to this hub.
You can create as many client as you wish.
· To move a connected object (station or trap) to another site and to relate it to a new hub, you just need to right-click on the icon of the object to be moved, then click on « More information ». In the window that opens, click on the « Delete » button.
Caution : Deleting a station will result in the deletion of all data that the station has already stored (photos, passage counts, etc.).
· When the object (station or trap) is deleted, you can create a new one on another site or for another client.
1.Plug the hub into the power outlet at least 10 minutes before turning on the stations or traps.
2.Turn on the station or the trap by pressing on the single button : the LED indicator flashes quickly.
3.When logging into the AEGIS.CONNECT platform, check that the « connection signal » icons located next to the objects are green.
1.Click on the station icon.
2.Click on the « More information » button.
3.Stay on the « Information » tab and scroll down the page to click on the « Trigger manual capture » button.
4.A new photo will be uploaded by the hub in less than two hours..
· At startup, the ON and OFF indicators on the connected station flash simultaneoulsy eleven times, every two seconds. This period allows the applicator to position the station properly and close it. A reference photo is then automatically taken after the eleventh flash.
· A new photo is automatically triggered every 24 hours and compared with the reference photo.
· If there is a significant difference between the 2 photos, the snapshot (« automatic trigger photo ») is transmitted to the AEGIS.CONNECT platform. It allows to visualize changes that have occurred in bait stations or mousetraps.
· In AEGIS.CONNECT, click on the trap icon, the number of captured and battery status are visible on the right side of the screen.
· For more detailed information, click on the « More information » button. Choose « Advanced data » tab : you will find the number of captures based on dates and times.
· On top of the AEGIS.CONNECT screen, click on the « Editing » and then on « Building management » tab.
· In the preview pane, on the left of AEGIS.CONNECT screen, select the relevant screen and click on the « pencil » icon next to the building for which a plan needs to be added.
· Click on the « Choose » button. The picture must be in JPEG or PNG format.
· Click on « Confirm » and then « Save ».
· In the « Users » tab, at the top of the AEGIS.CONNECT screen, select a user and click on « Edit ». You can then activate or deactivate the email alerts received by the user. There are three types of alerts :
1.Trigger alerts (captures at the trap or snapshot triggered at the station)
2.Activity level evolution (information related to the tracking of passage numbers)
3.Technical issues.
This is not possible, as specified in Article 6 of the AEGIS.CONNECT platform subscription agreement.
· The dashboard provides an overview of all objects (hubs, traps and stations) as well as on the maintenance or trigger alerts.
· With manager or administrator access, you can assign alerts to a technician or handle these alerts by yourself.
· With their access, the technician sees alerts related to the sites they are responsible for, as well as alerts assigned to them. They can then handle them.
· For assigning alerts à (link to tutorials)
· For ALL IN BOX connected objects : the icon changes colour automatically based on the number of passages recorded by the station.
1- Green : the station works but there are very few passages.
2- Orange : between 20 and 40 passages recorded.
3- Red : more than 40 passages recorded.
· Trap multi-capture CLASH !: the icon is green between 0 and 5 captures, it is becoming orange from 6 captured mice and red from 16 captured mice.
· For non-connecting stations, this configuration is done manually by the applicator based on their observations in the field.
· Regarding the exclamation point, it indicated the upload of a photo triggered automatically by the connected station. This means bait consumption or mousetrap triggering.
In the « Status » column, an exclamation point appears when there is no communication (loss of connection, battery failure, central hub disconnected) with the station.
An exclamation point appears in the trigger column when a photo taken automatically by the connected station is transmitted to AEGIS.CONNECT. This indicated that bait has been consumed, a mousetrap has been triggered, or the passage threshold has been reached.
1.Choose the relevant site.
2.Position yourself on the building or storey to be modificated. Click on the tab at the top right « Edit » then on « Building management ».
3.With the pencil icon you can change the plan by clicking on the « edit image » button. JPEG and PNG formats are compatible with the software.
1.Choose the relevant site and building.
2. In the « Edit » tab, on top of the screen, select « Building management ». Click on the « + » icon then on the « choose an image » button to upload the storey plan. Choose where to insert it above. JPEG na d PNG formats are compatible with the software.
3. You can rename this new level by clicking on the pencil icon.
4.Click « Confirm » and then « Save ».
This entry is only possible if you have an « Administrator » or « Manager » account.
Click on the « Client » tab at the top of the screen, then on « + ». Fill in the required information.
· For the exterior of the site, search for its address on Google Maps and take a screenshot. Then, embed this image into the paltform.
· For the interior of the site, ask your client for a sanitation plan, or take a photograph of the premises’ evacuation plan.
· To be integrated into the AEGIS.CONNECT platform, these images must be in JPEG or PNG format.
You can :
· Reset the connected station by pressing the multifunction button for 2 seconds.
· Or, from the AEGIS.CONNECT. platform, select the relevant connected station (PC…) and click on the « Reset » button.
You will find serial numbers :
· On the invoice
· On the shipping carton
· Inside the cover of the connected ALL IN BOX station and the trap multi-capture CLASH !.
· On the label attached behind the hub.
The two first letters of the serial number indicate the type of connected object : SG for Surigate (hub) – PC for connected station (ALL IN BOX) – PM for trap multi-capture (CLASH !).
1.Create the connected objects on the AEGIS.CONNECT platform starting with the hub.
2.Place them on the plan you have downloaded, approximately in the area where you intend to position them.
3.Go to the site to be protected to position the connected objects in the appropriate locations. First, plug in the hub and then turn on the connected objects.
4.You can now adjust the position of the connected objects on the AEGIS.CONNECT platform and start tracking.
This may be due to a brief network disconnection. Click on the « Reset » button to upload the reference photo. It may be take a few minutes before it appears on the AEGIS.CONNECT platform.
The station communicates with the hub every 2 hours to exchange various information : number of rodent passages, photo transmission, photo request, etc. If you trigger a manual snapshot, this one will be done and transmitted to the AEGIS.CONNECT platform upon the station / hub communication. The delay between your trigger request and the photo display is therefore a maximum of 2 hours.
Color Alerts Indicator Table
- Direction for use :
- DO NOT allow your children or individuals with reduced physical, sensory, or capabilities or those lacking experience or knowledge, to use or handle the trap.
-USE ONLY LR14 batteries in good condition, or use the 5V processor provided in trap’s box.
-ALWAYS STORE your trap at temperatures between 10°C and 25°C to conserve te lifespan of the supplied batteries.
-DO NOT USE the trap at lower temperatures below -18°C or above 40°C.
-ALWAYS DISPOSE OF batteries in accordance with current regulations.
-DO NOT drop loads heavier than 15kg above your trap.
-DO NOT play with the trap (be careful to children).
-AVOID handling the trap in the presence of children.
-DO NOT dive your trap in a liquid.
-DO NOT use a damaged trap.
-DO NOT alter/modify your trap
-WEAR appropriate safety equipment when preparing, setting or testing the trap.
-AVOID moving the trap while it is in operation.
-DO NOT handle the trap while it is in operation.
-ALWAYS REMOVE batteries or disconnect the trap before cleaning or handling.
-DO NOT insert anything into the trap’s tunnel.
-PROTECT from sunrays. Store it in a properly ventilated place and not expose it directly to rain or water jet.
-USE the trap only inside or if it’s outside, in a sheltered place and protected from bad weather.
-AVOID using the CLASH ! in very dusty environments.
-STRICTLY FOLLOW the instructions and indications provided..